
Monday, December 31, 2012
Cooking in the Kitchen with Not Elton John
I saw a t-shirt with these phrases on it last year with a picture of a pan full of bacon on it and knew then that I had to have it on my kitchen wall. Naturally, I had to put my own twist on it as well. A year later, and after two semesters of grad school, here they are.
Friday, December 28, 2012
Easy French Manicure is Not
Last night I tried to do a funky new-style French manicure using tape and paper reinforcement circles, as per this popular internet tutorial;
http://www.popcosmo.com/2012/05/04/how-to-do-a-french-manicure-effortlessly/
Here is a picture of my fingers all covered in tape:
And here is the "finished" look.
Part of my problem is that I HATE waiting for nail polish to dry. And another problem is that the darker color was actually thicker than it should have been because it's a little old. And the last problem is that I suck at doing my nails.
Let me know if you try this, and if you have better results!
http://www.popcosmo.com/2012/05/04/how-to-do-a-french-manicure-effortlessly/
Here is a picture of my fingers all covered in tape:
 |
| This doesn't look silly at all. |
And here is the "finished" look.
 |
| Messy, messy, messy! |
Part of my problem is that I HATE waiting for nail polish to dry. And another problem is that the darker color was actually thicker than it should have been because it's a little old. And the last problem is that I suck at doing my nails.
Let me know if you try this, and if you have better results!
Tuesday, December 25, 2012
Felt Ornaments

I sent some felt ornaments out with my holiday cards this year. These can also double as car air fresheners... just dab a little fragrance or essential oil on it!
This is a nice little project if you have a ton of felt lying around. Like so.

Felt
Thin cardboard
Thread or embroidery floss
Needle for above
Step 1: Draw the shape you want on the thin cardboard, & cut out. Make this shape a little smaller than you want your finished ornament to be.
Step 2: Using the cardboard as a template, cut 2 pieces of felt. One will be the front, and one will be the back.
Step 3: If you have details to add, sew them on or stitch them in a contrasting color. You can also glue things on, but I found that didn't work as well, probably because I didn't use felt glue.
Step 4: Now it's time to sew the two big pieces together. If you want your ornament to be stiff, sandwich your cardboard between the pieces of felt. Carefully pin in place around the cardboard. Cut a nice long piece of thread. Thread it on your needle, but don't knot it. Start at the top center of your ornament, and leave at least 4 inches of thread hanging loose. Whip-stitch all the way around your ornament. When you get back to the top, you can knot it with the beginning of the thread, then tie a knot up about 3 inches to create your hanging loop. Trim so the ends are even.
And that's it. Easy felt customized felt ornaments for your kooky friends! :)

Monday, December 17, 2012
12.17.12 Scott Pilgrim WIP
We can check Gideon's right arm off the list!
Two things: I'm pretty sure that the top part of Gideon's hand is actually Envy's arm, but they were the same thread colors, so I stitched it anyway. Also, Gideon doesn't have an elbow there because it's behind Lucas Lee's head. It'll be a while before we get to Lucas, though.

Two things: I'm pretty sure that the top part of Gideon's hand is actually Envy's arm, but they were the same thread colors, so I stitched it anyway. Also, Gideon doesn't have an elbow there because it's behind Lucas Lee's head. It'll be a while before we get to Lucas, though.

Saturday, December 15, 2012
Heirloom Christmas Stocking
My grandmother crocheted me this Christmas stocking when I was little.
This is my boyfriend's and my first Christmas together and he doesn't have a stocking of his own, so I'm going to make him one that coordinates with mine.
Since I don't have a pattern, the first step was figuring out the pattern. And I did! Now I just need to make 16 more squares...


Sunday, December 9, 2012
12.9.12 Scott Pilgrim WIP
When last we talked, I had just started to stitch Gideon's left hand. Now I've finished his entire left side.
You can see a small gap right at Gideon's waist. There's a small golden bird that's going to go there, and the bird's beak and the edge of the bird's head overlap Gideon.

You can see a small gap right at Gideon's waist. There's a small golden bird that's going to go there, and the bird's beak and the edge of the bird's head overlap Gideon.
Thursday, November 29, 2012
11.29.12 Scott Pilgrim WIP
Ok, I let 12 days go between updates. Time for a new one then.
Gideon's shirt is done as are the lapels and most of the middle of his coat. The outline of his left arm is done, and you can see the very beginnings of his left hand.
Like I said before, things move pretty quickly when I'm essentially just drawing his outline.

Gideon's shirt is done as are the lapels and most of the middle of his coat. The outline of his left arm is done, and you can see the very beginnings of his left hand.
Like I said before, things move pretty quickly when I'm essentially just drawing his outline.
Tuesday, November 27, 2012
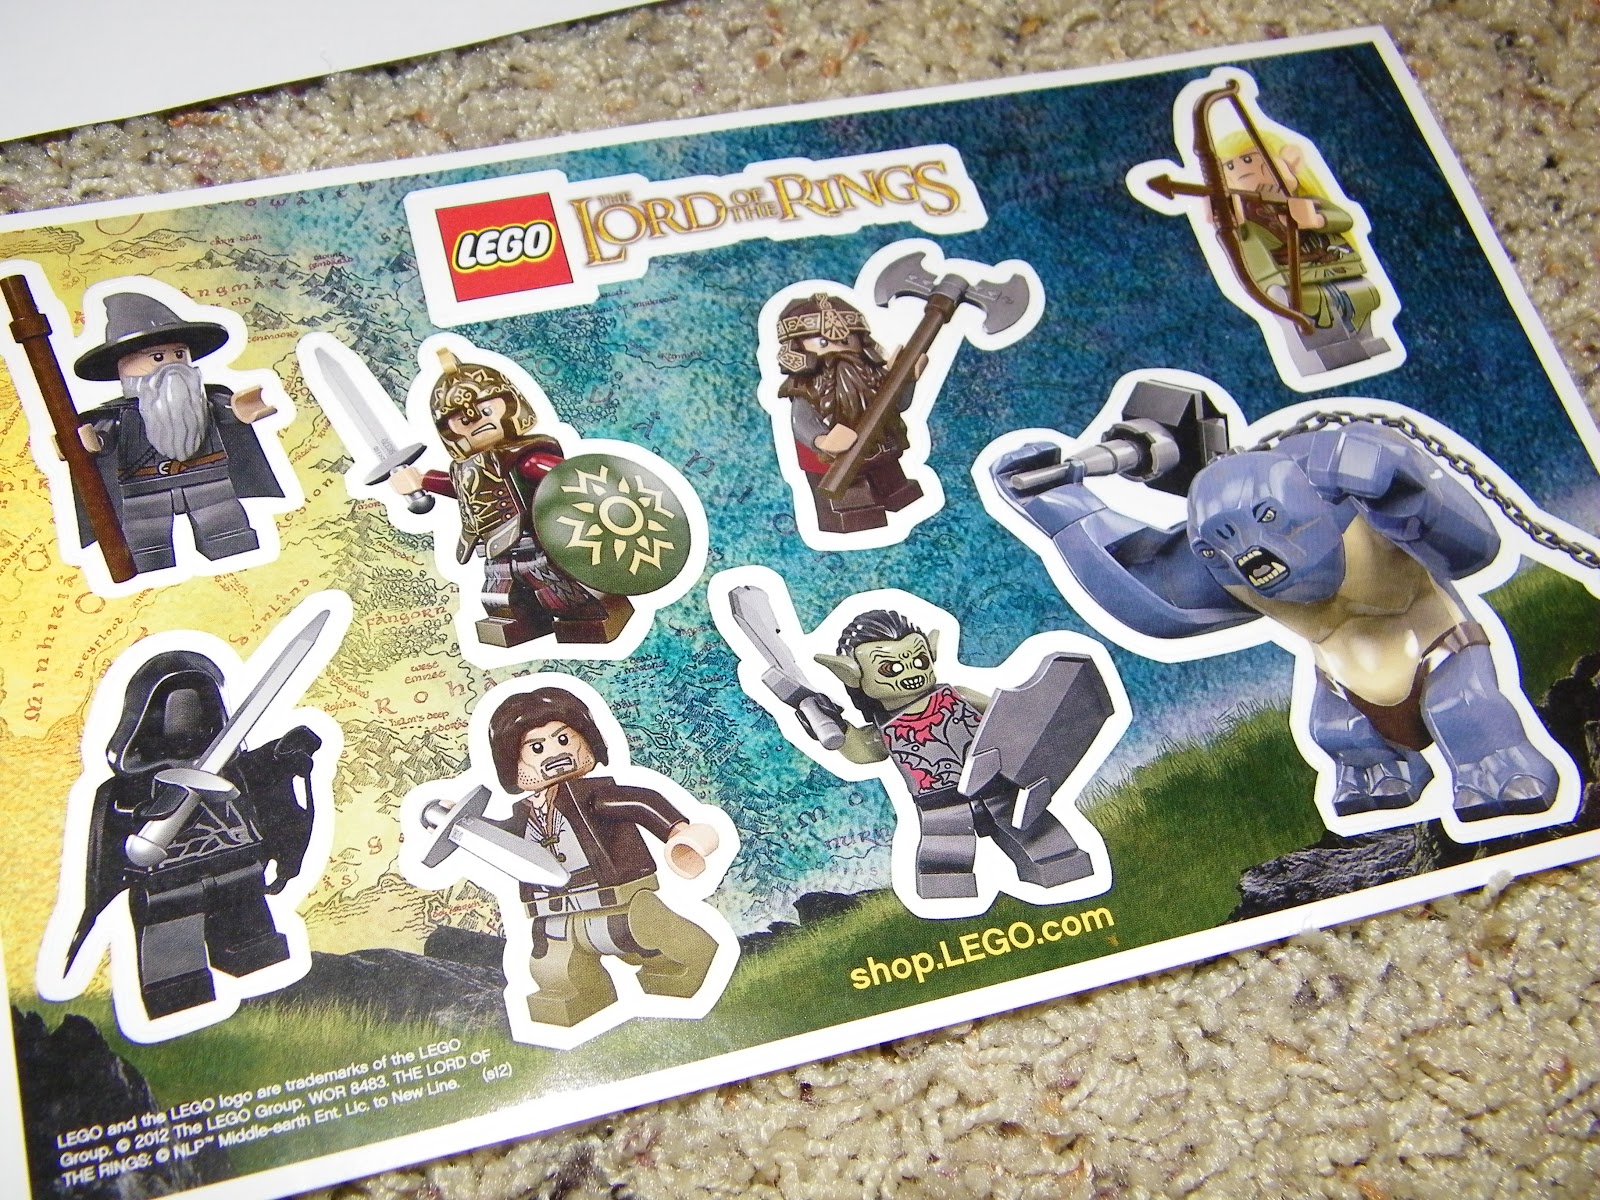
They Have a Cave Troll
We recently got a Lego Store in one of our area malls and it has been a disaster for our wallets (the husband wants a 4 foot Star Destroyer). The kids have enjoyed going to the mini-kit build events (first Tuesday of every month) so back in July when I saw they would be doing a larger build event tied into the new Lord of the Rings sets, I signed the kids (and husband) up. For answering trivia questions, the kids ended up scoring
some cute stickers. Rather than having them end up on random pieces of
furniture, I got the idea for a project.

You'll need stickers, scissors, and magnet paper. Mod Podge and small children are optional. I found the paper at my local Office Max because I was much too impatient to order it from the Internet, but it is cheaper when purchased online. The magnet paper is meant to be put through your printer, but I just had the kids apply the stickers directly to it. I had to go back and move some of the boy's stickers because they overlapping, but they enjoyed having some control over the project.

I was mildly concerned that it would be too easy for the stickers to peel off the magnet paper and since I didn't use all the Mod Podge in the bottle when I made the glitter shoes, I applied a top coat over the stickers. The stickers were left to dry for two hours and then I used scissors to cut them from the magnet sheet. I have little faith that the magnets will hold up anything other than themselves, but they are re-enacting the fight in the Mines of Moria on our magnetic dry erase calender.

Saturday, November 17, 2012
11.17.12 Scott Pilgrim WIP
Gideon's head is finished, and thank goodness.
Gideon's very tall, but most of his body is his white suit, so things will speed up from here. You can see the line of his shoulder, his red shirt collar and the start of his red necktie.

Gideon's very tall, but most of his body is his white suit, so things will speed up from here. You can see the line of his shoulder, his red shirt collar and the start of his red necktie.
Saturday, November 10, 2012
11.10.12 Scott Pilgrim WIP
Back to the focused shots, then.
Gideon's hair is completed, as are his glasses. His ear is mostly done, and you can see the line that makes up most of his nose.

Gideon's hair is completed, as are his glasses. His ear is mostly done, and you can see the line that makes up most of his nose.
Monday, November 5, 2012
Prop Making 101
Ok, I'll be honest. I never thought of myself as a "crafty" person. I'm much more of a engineer by nature. That being said, I've been mulling over the idea of a few costumes for ECCC 2k13. One of which needed some props. I scoured the internet looking for the 2 things I felt I would need to add to the costume. One I found easily, the other was either non existant, or you had to buy expensive ones that people had made. Then I stumbled upon the necessary data and blueprints to build your own.
Follow me through this new frontier.
I decided the best way to make this would be to craft the prototype out of styrene. Styrene is what makes styrofoam, but there's almost no air in it. It's flat and hobbyists love this for building things. After doing some research, I went to the local hobby shop and gathered my supplies.

For this project I used:
1) Hobby Mat (there's a lot of cutting and I am not buying another 20 dollar Ikea coffee table)
2) X-acto knife
3) Some sort of square preferably metal (as you can see I bought plastic)
4) Styrene sheets. 1.5mm (1), 1.0mm (2) and .75mm (2)
5) Ambroid Proweld. This stuff is amazing. Takes 10 seconds to "weld" the plastic together
6) X-acto compass cutter
7) White plastic hobby putty
8) Sandpaper
What you will do is start by measuring out what you will need to create the pieces. The first piece was a rectangular shape for the grip. The great thing about styrene is that you just have to score the sheet and bend it and it will give you a good clean line. However, because of the plastic square, my lines were crooked. Mainly because I kept cutting into the square with the knife. If I had to do it all again (and I might), I would use a metal ruler and a pencil. Measure several times, cut once.
Once you have your pieces, line two of them up as you want them and add some Proweld to the joint. Hold it and count to 10. It should hold. Add a few more passes with the weld just to make sure. 30 min later I had something useable.

Just look at those sexy legs.
From there I measured end pieces and attached those. That wasn't easy. First off I noticed that my sides were not the same length so it took some time shaving them down. Then I had to make many passes to keep it secure.
This particular prop needed a grip on the handle, so I used the .75mm styrene to craft the additional pieces. The finished result is below. 2 sides had the cut out and the other two were flush. Again, my hastiness led to crooked edges. This will require sanding and putty to fill in the gaps.

Finally I had to work on the top piece (pictured below) It's a type of trapezoid, one side is at a sharper angle than the other. It was getting late and I wasn't very focused so this piece doesn't look that good. It will require a lot of clean up work on the edges and the bottom features some gaps in the plastic that will require putty to fix.

Stay tuned for the next installment when we bust out the compass cutter and putty.
Can you guess what this is?
Thursday, November 1, 2012
11.1.12 Scott Pilgrim WIP
One year ago yesterday was the first update I posted. *sigh* This is going to take a while, isn't it? I'm going to start putting the year in the title of these posts because now it's necessary to keep track. CURSE YOU, RED BARON.
In any case, I'm going to give y'all a full project shot one update earlier than normal. It's probably a week or two later than normal due to delays in updates, but such is life.
Gideon's crazy anime hair is almost done, so he should have the beginnings of a face when next we talk.

In any case, I'm going to give y'all a full project shot one update earlier than normal. It's probably a week or two later than normal due to delays in updates, but such is life.
Gideon's crazy anime hair is almost done, so he should have the beginnings of a face when next we talk.

Thursday, October 25, 2012
10.25 Scott Pilgrim WIP
I skipped out on doing an update last week for a couple of reasons. 1) Not enough progress and 2) The progress that I did make wasn't very noticeable. So now I've gotten through the bulk of Gideon's hair, down to where the shading is changing. Now you can see how far I've gotten in the last 2 weeks.
It looks like next week will be the one year mark since I started this idiot project, so I'll do a full project shot next week, 1 update earlier than normal.

It looks like next week will be the one year mark since I started this idiot project, so I'll do a full project shot next week, 1 update earlier than normal.
Thursday, October 18, 2012
So, you want to learn to knit?
I've been where you are, friend. Lurking on the periphery of the knitted arts. Reading blogs, maybe watching a youtube video or two. Perhaps you've joined Ravelry and found some cool stuff you want to make but now you need to make the plunge and learn how to get started. It's overwhelming, I know! I've been where you are! Let me get some guidelines down for you. A lot of knitters will tell you to go to a local yarn store or craft store and ask for help or sign up for a class. I am not one of these people as I am pretty shy in real life and the idea of going somewhere and asking for help is awful.
Here's a list of materials I recommend you pick up. You don't have to spend a fortune!
Here's a list of materials I recommend you pick up. You don't have to spend a fortune!
- One pair of US size 10 (or larger) knitting needles. The bigger the needle, the bigger the loops and the easier it is to get the needle through those loops when you're knitting. Also, I wouldn't recommend getting the cheap aluminum needles. I'm not trying to be snobby but they tend to stick to the yarn and make it harder to get the loops off which can cause unnecessary headaches. If you do choose the aluminum (and who can blame you, they're super cheap and you don't know if you like knitting yet) just keep the stickiness in mind while your working with them!
- One skein of yarn. Again, I'm probably going to come off like a snob here but let me explain. I don't recommend getting the red heart super saver yarn. While it's inexpensive, it's also 100% acrylic and not the good, soft acrylic either (of which there is some). The issue with this yarn, I've found, is that it's also super sticky and tends to not want to come off the needles. I also find it squeaky and it can hurt my hands. I'm not saying you should buy 100% cashmere or anything crazy but maybe look for something with some wool content or a higher quality acrylic. Don't spend $20 on a skein but maybe look into spending $5 instead of $3. Also, be sure to get a yarn that's rather thick - worsted weight or chunky. It's easier to knit with larger needles and works up fast. Color doesn't matter, but choose a yarn that you like. That's the most important thing. If you're working with a yarn that scratches you, or you hate the color, you're not going to have fun.
This post originally appeared over at Knitterly Notions
Monday, October 15, 2012
As I live and breathe
Hello Sarcastic Crafters! It's been a while since I've updated over here, so I wanted to give you a quick rundown on what crafty projects I've been working on...so I stole a blog entry from myself. -Mal
This weekend was eventful. I finished a project and FINALLY took pictures of everything. ENJOY.

- Finished Irish Hiking Scarf

First up is the Irish Hiking Scarf. I finished it a week or two ago, still haven't blocked it but finally took a picture! I really like it and can't wait to give it to the boyfriend when I see him in a few weeks.

- The V-Scarf

Next up is the progress I've made on the V-Scarf...granted it's not a lot but I still love the pattern and the yarn. I've put it aside for now as I'm going to work on a birthday present for my mom and since her birthday is before Christmas it take precedence.

- No Pattern Hat from "Knitting Rules" by Stephanie Pearl-McPhee

I finished the No Pattern Hat for myself in record time (way quicker than a scarf) and I kind of love it. I can't wait to wear it tomorrow morning.

After I finished the first hat, I immediately cast on for another one - this time for my sister. This one is knitted out of some Socks That Rock mill-ends. I am delighted by the way the white has been spiraling around the hat. DELIGHTED. I have a ton of STR but this is the first bit I've knitted up. It's awesome and I think I've found my new favorite yarn.

- Malabrigo worsted in Azalea

And finally, I ordered some yarn from Eat. Sleep. Knit and it came on Saturday (including some 16" nickel-plated circulars and some nickel-plated DPNs for more hats - turns out wooden needles hurt my hands). This will be knit up into a hat for my mom's birthday - it's going to be awesome.
Expect to see more hat pictures in the near future. Maybe I'll branch out into a pattern for one of them. I'm hoping to give mittens or fingerless gloves a try next.
This entry was originally posted at knitterlynotions.com.
Thursday, October 11, 2012
10.11 Scott Pilgrim WIP
Like I said last time out, 12 days ago, Gideon has crazy anime hair. You can see that quite well here. Still a long way to go before I'm finished with his hair, though.

Monday, October 1, 2012
Super-easy Bottlecap Magnet Tutorial
So, you've spent a good amount of money and time hunting down awesome beverages, and then you've drunk them, and now you've got nothing left to show for it. But wait... did you save the bottle caps? Then here is a quick craft project for you!
Supplies needed:
1) Bottle caps (try to pick the flattest ones you have)
2) Hot glue gun
3) Hot glue sticks (several)
4) Round magnets
Step 1: Turn your bottle cap upside down. Put in a nice big pile of hot glue, keeping it as round and even as you can. DO NOT at this point put in your magnet. First of all, these magnets are not quite tall enough to keep the pointy sides of the bottle cap from touching the magnetic surface you're intending to attach these to. And secondly, because when the magnet snaps down into that puddle of hot glue, it's going to get all over your fingers and that crap hurts.
Step 2: Wait until the glue inside the bottle cap has cooled and solidified. Now, put a dot of hot glue on the magnet, and press the magnet, glue side down, into the bottle cap. Try to keep the magnet as level as you can. Hot glue is pretty forgiving here, and if you don't get it right, you can wait for it to cool down, pop out the magnet and try again.
Step 3: Find a magnetic surface (a refrigerator is really the perfect home for these), and enjoy your new magnets!
 |
| Supplies! |
Supplies needed:
1) Bottle caps (try to pick the flattest ones you have)
2) Hot glue gun
3) Hot glue sticks (several)
4) Round magnets
 |
| Hot glue is hot. Just sayin'. |
Step 1: Turn your bottle cap upside down. Put in a nice big pile of hot glue, keeping it as round and even as you can. DO NOT at this point put in your magnet. First of all, these magnets are not quite tall enough to keep the pointy sides of the bottle cap from touching the magnetic surface you're intending to attach these to. And secondly, because when the magnet snaps down into that puddle of hot glue, it's going to get all over your fingers and that crap hurts.
 |
| I think it's looking at me... |
Step 2: Wait until the glue inside the bottle cap has cooled and solidified. Now, put a dot of hot glue on the magnet, and press the magnet, glue side down, into the bottle cap. Try to keep the magnet as level as you can. Hot glue is pretty forgiving here, and if you don't get it right, you can wait for it to cool down, pop out the magnet and try again.
 |
| Fancy! ;p |
Sunday, September 30, 2012
9.30 Scott Pilgrim WIP
It's been a couple of days since I took this picture, but I haven't gotten any more work done since then. Gideon has some crazy anime hair here, and you can see the first couple of spikes of it.
Once I get to Gideon's body, work should progress much quicker because of his white suit.

Once I get to Gideon's body, work should progress much quicker because of his white suit.
Thursday, September 20, 2012
9.20 Scott Pilgrim WIP
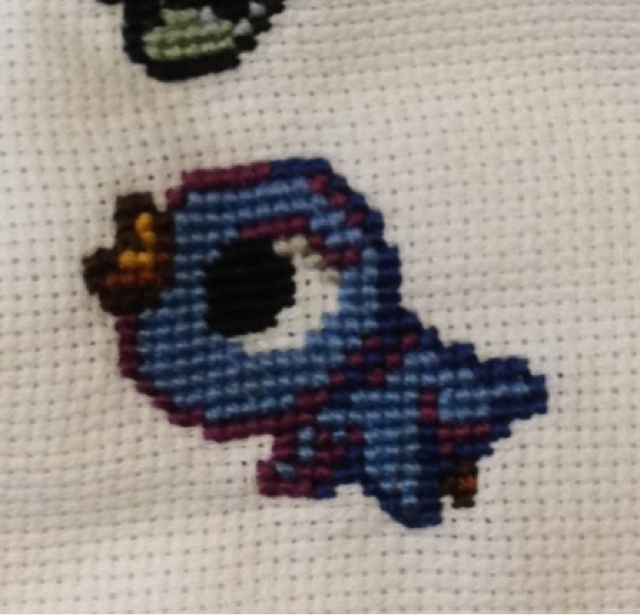
Work in progress is a slightly misleading name for this post, as there's nothing in progress here. There's a tiny blue bird to the right of Gideon Graves, and I stitched the bird before I started on Gideon.
Here's the bird, and next week, you'll see my progress on Gideon!

Here's the bird, and next week, you'll see my progress on Gideon!
Friday, September 14, 2012
9.14 Scott Pilgrim WIP
As I predicted last week, I finished Kim Pine. I've moved all the way back to the right hand side and after I finish this tiny blue bird just a little bit below Nega Scott, I'll start work on Gideon Graves. So you've got that to look forward to next week!


Sunday, September 9, 2012

Saturday, September 8, 2012
9.8 Scott Pilgrim WIP
Things I discovered this week: The actress that played Kim Pine in the Scott Pilgrim movie plays Maggie, the blonde junior producer on HBO's The Newsroom.
Did not see that coming.
As far as the project goes, I'm down to the bottom of Kim's left shoe and her lower right leg. So, this might be the last time you see Kim until the next full project shot. We'll see what happens...

Did not see that coming.
As far as the project goes, I'm down to the bottom of Kim's left shoe and her lower right leg. So, this might be the last time you see Kim until the next full project shot. We'll see what happens...

Wednesday, September 5, 2012
Custom Pushpins
I wanted some owl pushpins for the cork-board in my office, but I didn't want to spend a ton of money, and all the owl pushpins I saw were way cutsier than what I had in mind. So I came up with this quick fix, for about $5.00.
Supplies needed:
Flat pushpins
Buttons or other embellishments
Hot glue gun and hot glue
Wire-cutters or snips, if using buttons with shanks
Step one: If using buttons with shanks, cut them off as close to the button as possible. Your goal is to get the back of the button as flat as you can.
Step two: Put a dollop of hot glue on the back of your button, and press a push pin into it. You may need to try a couple of times, as the "flat" pushpins actually have a bit of a dome to them. Hold the pieces together until the glue cools.
Step three: Put your pins in your cork board!
Please note that this was a quick-n-dirty project, hence the hot glue. I'm guessing a few of these will pop off with use, and I will probably just hot-glue them back on. You could easily use a different adhesive (maybe superglue?) for a more sturdy end product.
 |
| Supplies! |
Supplies needed:
Flat pushpins
Buttons or other embellishments
Hot glue gun and hot glue
Wire-cutters or snips, if using buttons with shanks
 |
| Snip, snip! |
Step one: If using buttons with shanks, cut them off as close to the button as possible. Your goal is to get the back of the button as flat as you can.
 |
| Gluing these is a bit of a pain. |
Step two: Put a dollop of hot glue on the back of your button, and press a push pin into it. You may need to try a couple of times, as the "flat" pushpins actually have a bit of a dome to them. Hold the pieces together until the glue cools.
 |
| AND DONE. |
Please note that this was a quick-n-dirty project, hence the hot glue. I'm guessing a few of these will pop off with use, and I will probably just hot-glue them back on. You could easily use a different adhesive (maybe superglue?) for a more sturdy end product.
Monday, September 3, 2012
A Sticky Wicket
I lost my old tomato shaped on cushion, so I was keeping my pins in a little bowl. Which I always tipped over, and then I'd step on them, and everything sucked forever. So I made this:

Friday, August 31, 2012
8.31 Scott Pilgrim WIP
It's a day later than normal, and two days later than it was teased, but here's a new update on my project.
Work on Kim Pine's skirt is finished and I'm a couple of lines in on her legs. As you can see, Tamara Chen is starting to sneak back into the picture because of where Kim's legs are. Will we see more of Tamara next week? WHO CAN SAY?

Work on Kim Pine's skirt is finished and I'm a couple of lines in on her legs. As you can see, Tamara Chen is starting to sneak back into the picture because of where Kim's legs are. Will we see more of Tamara next week? WHO CAN SAY?

Monday, August 27, 2012
Makin' horns...
The last week or so I have been making horns, getting ready for my Halloween rush. Here are some progress shots!
 |
| All my horns start out as balls. |
 |
| Then I shape them into horns. |
 |
| Tray of horns, about to go into the oven. |
 |
| Ditto. |
 |
| Bowl of horns, cooling in ice water. |
Want to learn how to make some horns yourself? Check out my tutorial here!
Don't want to make your own? These should all be available soon at my etsy shop.
Thursday, August 23, 2012
8.23 Scott Pilgrim WIP
I wasn't planning on posting an update today, but when I checked the last update, I actually have made some significant progress, so here we are!
Kim has hands now, and I have just one line of shading left on her arms. Hopefully by next week, I'll have started on her skirt.

Kim has hands now, and I have just one line of shading left on her arms. Hopefully by next week, I'll have started on her skirt.
Subscribe to:
Posts (Atom)