
Showing posts with label painting. Show all posts
Showing posts with label painting. Show all posts
Monday, December 31, 2012
Cooking in the Kitchen with Not Elton John
I saw a t-shirt with these phrases on it last year with a picture of a pan full of bacon on it and knew then that I had to have it on my kitchen wall. Naturally, I had to put my own twist on it as well. A year later, and after two semesters of grad school, here they are.

Monday, August 20, 2012
A Mad Tea Party Sculpture
I've been wanting to do this project since I saw a tiny teacup jumble jewelry stand at an overpriced department store. Of course, being an overpriced department store, it was almost $70 for a tiny stand that wouldn't hold all of my jewelry if it were able to grow to twice its size. Being me, I immediately said, "Pfft. I can do that." Fast forward almost two years later and I'm just now doing this project... surprising no one. In the meantime, Plutonium Paint was kind enough to send me some of their spray paint to check out, so that was a perfect opportunity for me to make my teacup sculpture.
Here's what you need to make one of your own:


Here's what you need to make one of your own:
- Teacups. They can be matching or mismatched. I bought mine at my local Salvation Army for 15 cents per teacup and got a plethora of different teacups - some matching, many not.
- A plate to stack your teacups on. (Also obtained at the SA for 50 cents.)
- Some type of adhesive. I used Loctite Epoxy gel & was pretty impressed with its adhesive properties. After I put all the teacups I wanted together, I waited about 5 minutes and flipped the whole thing upside to see how well it would stay together (also known as the Dairy Queen Blizzard test) and it didn't budge an inch. Which is amazing. Most adhesive gels need to "settle" for at least 24 hours before they're at optimum adherence.
- Spray paint. As I said before, Plutonium Paint was kind enough to send me some spray paint and I was very impressed. (They're not paying me for this information, by the way.) It covered VERY well. It only took one coat whereas if I were using some of the leading brands, it may take up to 3 or 4 coats. I was able to spray from various angles without it clogging - even upside down. You definitely don't need a primer with this spray paint, so ultimately, you'd save money because you'd use less paint and wouldn't need a primer. It doesn't even drip if you overspray. I tried to misuse this paint every way that was possible and it still looked beautiful regardless of anything I did to mess it up. It dried very quickly and you want to know what the best part was? IT SMELLED LIKE VANILLA WHEN IT DRIED. I've already put the sculpture on top of a bookshelf and can't stop sniffing in its general direction when I pass by there. It's almost become a problem. Almost.
Okay. So... to make your very own delightful teacup sculpture, first you need to clean your teacups to make sure there isn't any adhesive from the tiny price stickers. When I was done doing that, I placed all of the teacups out so I could choose which ones I wanted to use. As you can tell, I was also indulging in my current Netflix addiction, 30 Rock. What you can't see from this picture is the delectable Bloody Mary I was also also indulging in. I don't know who introduced me to olives in Bloody Marys, but god bless that individual.

Unfortunately, there would be no spray painting inside this particular day, so I had to turn 30 Rock off and go outside. Mainly because my boyfriend has forbidden me from spray painting inside. Again. >.>
Set up your teacups and plate on whatever you're choosing to spray paint on and get to spraying.

Normally, I'd admonish you all to spray carefully and evenly with light, even strokes in the same direction, taking care to not overspray. I did that with all of the teacups, but with the plate, I tried my "misuse" approach. No dice. It looked just like the teacups - evenly covered and painted with no splotches of paint. Freaking amazing.


Once everything is dry, take them back inside to start putting everything together. This is where the fun of mixing your epoxy gel comes in. I bought the kind that has two plungers in one container to avoid putting forth great effort. Remember: I'm lazy.

Once the epoxy gel was mixed, I used a toothpick to apply it to the teacups so they wouldn't fall down all willy nilly like teacups are wont to do.

Once I was through putting the teacups in the positions I preferred and let the epoxy dry, I sadly discovered that it dries... white-ish.

Nice. So back to the spray paint I went.

In the end, the teacup sculpture looks great.

I'll probably end up putting it in our bedroom to save it from the kittens from Hell. God forbid I could ever own a normal pet.

Seriously. What kind of cat seduces the camera? It's not right.
Sunday, August 19, 2012
Twin Peaks Laura Palmer Doll
Warning: I am a huge Twin Peaks fan and I recently decided to attempt to make some custom Barbie dolls, and while discussing this with a close friend the two ideas coalesced into the idea for this project. I'm not a serial killer or anything, swear to soap.
Screen shots from the show provided for reference...
The next custom Barbie I make will be a representation of a live person. Probably.
And after I get better at it, I will post some tips and tricks and some links to helpful doll customizing sites!
Screen shots from the show provided for reference...
 |
| She's dead... |
 |
| Wrapped in plastic. |
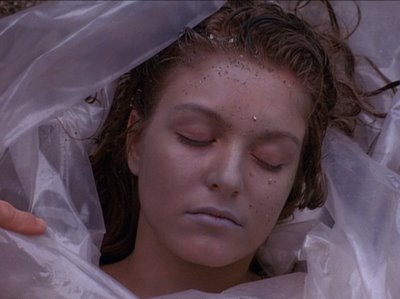 |
| Good Lord, Laura! |
 |
| Laura Palmer. |
 |
| *Deputy Andy weeps* |
The next custom Barbie I make will be a representation of a live person. Probably.
And after I get better at it, I will post some tips and tricks and some links to helpful doll customizing sites!
Wednesday, June 27, 2012
I Hate Our Dryer...
...so I spray painted it! Well, if we're going to be honest, first, I used blue acrylic paint on it to fill in the hideous rust spots. Nice, eh? Our dryer has seen better days. I really wish I'd taken a "before" picture, so you could see the 1980s beauty of it all. Regardless, I have "after" pictures and we all know that's what you're really after.
Here's what you need to make your very own amazingly spray painted dryer and/or washer:


Here's what you need to make your very own amazingly spray painted dryer and/or washer:
- A hideous washer and/or dryer. Or not so hideous. Whatever.
- Primer. I used Kilz spray primer because we have a theme going here. The theme is: Heather is lazy & just wanted to spray paint things today. See also: Kilz spray primer is THE BEST. The best. In case you missed it, Kilz spray primer is the best. #thebest
- Spray paint. I used Krylon Indoor/Outdoor Sun Yellow in Gloss. I like Krylon because it's a high quality paint. After used, it lasts a long time and sprays on smoothly. It also has the easiest nozzle to press down, so my arthritic fingers appreciate it.
- Contact paper. I used plain white contact paper so I could have a smooth base to spray paint. The stippled kind would be more difficult to get an even layer of spray paint laid out.
If you're doing your spray painting outside or in a well ventilated area like a normal person, that's all you need. If you're like me and you like to do things crazily like, oh, I don't know... spray paint inside your laundry room, then you probably need some kind of tarp or covering. I used aluminum foil because it's moldable and I can just throw it out when I'm done. So! Getting down to business.
First, you need to tape off anything you don't want covered in a fine sheen of spray paint. Of course, we hope you're outside in the fresh air & not holed up in a tiny room where you're about to give yourself "Sun Yellow" boogers. Next, spray on your primer. Use light, even strokes when spraying and try to start and end off of the area you're working on so you don't end up with the blobs of paint at each point. Wait for this to dry. I suggest drinking whilst doing this. My personal choice of beverage today was Wild Turkey & Diet Dr. Pepper. But you know, drink what you want.
Once the primer is dry, you may start spray painting with your color of choice. Again, use light, even strokes so you don't end up with disgusting blobs of paint everywhere. You also need to spray paint in the same direction. I usually use a left to right motion, then go right to left so as to eliminate any stripes. Wait for this to dry. While you're waiting, drink some more. Or you can start working on your contact paper polka dots. I chose to do both. Grab a sharpie & a saucer you're not fond of and get to work marking out dots. And drinking. That's the important part. Drinking. Once you have a sufficient amount of dots and the spray paint is dry, start sticking on your dots in any pattern you feel would be appealing. I chose to do a pattern similar to dice. What can I say? I like symmetry. And Wild Turkey. Both of those things.
At this point, you could do your other appliance the same or you could do an opposite effect. I chose the opposite effect. Mainly because of my first point when addressing the theme of the day. I'm lazy. So I spray painted the contact paper, made some dots, and started slapping those on the washer. Chuck got home before I could finish, so I'll probably finish it up on my next day off. What!? We always have a Ramsay marathon on Wednesdays of MasterChef & Hell's Kitchen. (GO KIMMIE & CHRISTINE!) Regardless, now we have an awesome splash of color in our tiny tiny laundry room and I can start on my next project: spray painting our kitchen table. Bam. Enjoy spray painting your appliances.
Pictures! Pictures! Pictures! Pictures! Pictures! Pictures! Pictures! Pictures!


Thursday, December 29, 2011
Thank Jesus Puppy for Pinterest
So... somehow I got shanghai'd into participating in C's family Christmas, including a Secret Santa swap. I drew his grandmother's name and she is OBSESSED with cardinals. Seriously. Her house looks like a cardinal museum. I saw a mixed media project on Pinterest involving newsprint and a cardstock cut-out sparrow on a sparse branch about two months ago and it inspired me to make this 24 x 30 in. mixed media cardinal project for her. I sketched the cardinal out in my sketchbook with a black fine-point Sharpie to get the shape out on paper.

For the background I cut out the print sections from some (extremely) old medical journals I've been bizarrely saving since college & glued them to the canvas with Elmer's Glue-All. I used the stroke book. (Not sure if anyone's ever had a stroke in C's family, but if so, I hope they don't pay too much attention to the words behind the bird. I'm just saying.)

After waiting an appropriate time for the glue to dry, (read: it was still gummy and cold and I could feel it moving around under the paper), I free-handed the cardinal & a branch onto the canvas with the Sharpie & filled it in with black acrylic paint. Voila! Cardinal "painting" for grandma.

By the by... apparently in C's family, Secret Santa means you give one another gift cards, beef jerky, & pretzel rods, so needless to say, everyone was in awe of my gift. Glad to know I don't have to put in any effort next year.
Subscribe to:
Posts (Atom)