
Showing posts with label insane people. Show all posts
Showing posts with label insane people. Show all posts
Saturday, August 31, 2013
I Threw My Pie For You
Like most Netflix watchers, I obsessively ran through Orange is the New Black in a glorious binge watch over a 24-hour period. I also ordered the book the series is based on around episode 3 of my binge watch. (Spoilers: the series is way more dramatic and entertaining, but the book did spur me on to investigate what I can do for prison reform.) Needless to say, this series has permeated the day-to-day conversations of most of my friends. A largely inappropriate Twitter conversation involving @VanitySized , her Crazy Eyes like love for @Miss_Anthrope, and @DavidPLew's subsequent anguish over being assigned the role of Jason Biggs/Larry in their forbidden Sapphic love triangle resulted in this free handed embroidery.

Wednesday, August 21, 2013
Tiny Printable Blank Books
I needed a very, very small TARDIS-looking journal for a project I'm working on, and thought I would share how I made it, and how you can make other tiny blank books, with you.

These books are fairly to scale for a Barbie-sized doll. You can use them as doll accessories, or as gifts for a book-obsessed friend (I have many of these), or just leave them for people to find in odd places, whatever. :)
Supplies needed:
White cardstock
Printer paper
Printer
Glue tape or glue
Marker that matches the color of the book you want to make
Ruler or straight edge
Small pointy object (I used a push-pin)
Scissors or exacto knife (a paper-cutter is handy as well, if you have one)
Print-out of book covers
Print-out of book pages
Step 1: Download the book covers and pages using the links above. Print the book covers out on cardstock, and the pages out on regular printer paper.
Step 2: Cut out your book cover along the printed edges. Cut your book pages into long, thin strips (this is where a paper-cutter is helpful to get a nice straight cut). There are two sizes of book, large and small. Choose a strip that matches the size of your book!
Step 3: Flip your book cover over and, using your small sharp object such as a pin and a ruler, score along the fold lines. You can fold without scoring, but this gives you a much cleaner edge. Fold the top and bottom tabs over first, then the side tabs. You may need to trim the sides of the tabs a bit so that they sit flat and the white doesn't show when looking at the front of the book. Once you have that folded to your satisfaction, you can put a bit of glue on the side flaps to hold them in place.
Step 4: You should be able to see where the spine should go by looking at the flaps inside of the book.Use your straight edge to score the two lines of the spine , and fold upward. The cover of your book is almost done!
Step 5: All this folding may be causing a bit of white to show through at your creases. You can color the edges and creases with a sharpie that matches your book color to disguise this. Or, leave it as-is for a weathered appearance.
Step 6: Fold one of your page strips, accordion-style, to create the interior of your book. For super-straight folds, I again recommend scoring lightly before folding. Check to make sure your pages fit inside your book. If you haven't folded them PERFECTLY even, that's ok... just trim off the top and bottom of the folded pages.
Step 7: Run a strip of glue along the interior spine of your book cover, and the outside flaps of your pages. Carefully line up the pages inside the book cover and press in place. And there you have your teensy tiny book!

Book covers included in this tutorial:
TARDIS journal
The Neverending Story
A City With No People
The Big Peruvian Book of Small Peruvian Snakes
A diary
Mr. Bunnsy Has An Adventure
Handbook for the Recently Deceased
Pretty blank book
I most likely will make some more when I have the time. Let me know if the comments if there is anything particular you want me to do!

These books are fairly to scale for a Barbie-sized doll. You can use them as doll accessories, or as gifts for a book-obsessed friend (I have many of these), or just leave them for people to find in odd places, whatever. :)
Supplies needed:
White cardstock
Printer paper
Printer
Glue tape or glue
Marker that matches the color of the book you want to make
Ruler or straight edge
Small pointy object (I used a push-pin)
Scissors or exacto knife (a paper-cutter is handy as well, if you have one)
Print-out of book covers
Print-out of book pages
Step 1: Download the book covers and pages using the links above. Print the book covers out on cardstock, and the pages out on regular printer paper.
Step 2: Cut out your book cover along the printed edges. Cut your book pages into long, thin strips (this is where a paper-cutter is helpful to get a nice straight cut). There are two sizes of book, large and small. Choose a strip that matches the size of your book!
Step 3: Flip your book cover over and, using your small sharp object such as a pin and a ruler, score along the fold lines. You can fold without scoring, but this gives you a much cleaner edge. Fold the top and bottom tabs over first, then the side tabs. You may need to trim the sides of the tabs a bit so that they sit flat and the white doesn't show when looking at the front of the book. Once you have that folded to your satisfaction, you can put a bit of glue on the side flaps to hold them in place.

 |
| Look carefully to see the score marks on the back of the book cover. |
Step 4: You should be able to see where the spine should go by looking at the flaps inside of the book.Use your straight edge to score the two lines of the spine , and fold upward. The cover of your book is almost done!
 |
| Score and fold along imaginary red lines. |
Step 5: All this folding may be causing a bit of white to show through at your creases. You can color the edges and creases with a sharpie that matches your book color to disguise this. Or, leave it as-is for a weathered appearance.
 |
| Yum, marker smell! |
Step 6: Fold one of your page strips, accordion-style, to create the interior of your book. For super-straight folds, I again recommend scoring lightly before folding. Check to make sure your pages fit inside your book. If you haven't folded them PERFECTLY even, that's ok... just trim off the top and bottom of the folded pages.
Step 7: Run a strip of glue along the interior spine of your book cover, and the outside flaps of your pages. Carefully line up the pages inside the book cover and press in place. And there you have your teensy tiny book!

Book covers included in this tutorial:
TARDIS journal
The Neverending Story
A City With No People
The Big Peruvian Book of Small Peruvian Snakes
A diary
Mr. Bunnsy Has An Adventure
Handbook for the Recently Deceased
Pretty blank book
I most likely will make some more when I have the time. Let me know if the comments if there is anything particular you want me to do!
 |
| A whole library, right in your hand! |
Monday, August 20, 2012
A Mad Tea Party Sculpture
I've been wanting to do this project since I saw a tiny teacup jumble jewelry stand at an overpriced department store. Of course, being an overpriced department store, it was almost $70 for a tiny stand that wouldn't hold all of my jewelry if it were able to grow to twice its size. Being me, I immediately said, "Pfft. I can do that." Fast forward almost two years later and I'm just now doing this project... surprising no one. In the meantime, Plutonium Paint was kind enough to send me some of their spray paint to check out, so that was a perfect opportunity for me to make my teacup sculpture.
Here's what you need to make one of your own:


Here's what you need to make one of your own:
- Teacups. They can be matching or mismatched. I bought mine at my local Salvation Army for 15 cents per teacup and got a plethora of different teacups - some matching, many not.
- A plate to stack your teacups on. (Also obtained at the SA for 50 cents.)
- Some type of adhesive. I used Loctite Epoxy gel & was pretty impressed with its adhesive properties. After I put all the teacups I wanted together, I waited about 5 minutes and flipped the whole thing upside to see how well it would stay together (also known as the Dairy Queen Blizzard test) and it didn't budge an inch. Which is amazing. Most adhesive gels need to "settle" for at least 24 hours before they're at optimum adherence.
- Spray paint. As I said before, Plutonium Paint was kind enough to send me some spray paint and I was very impressed. (They're not paying me for this information, by the way.) It covered VERY well. It only took one coat whereas if I were using some of the leading brands, it may take up to 3 or 4 coats. I was able to spray from various angles without it clogging - even upside down. You definitely don't need a primer with this spray paint, so ultimately, you'd save money because you'd use less paint and wouldn't need a primer. It doesn't even drip if you overspray. I tried to misuse this paint every way that was possible and it still looked beautiful regardless of anything I did to mess it up. It dried very quickly and you want to know what the best part was? IT SMELLED LIKE VANILLA WHEN IT DRIED. I've already put the sculpture on top of a bookshelf and can't stop sniffing in its general direction when I pass by there. It's almost become a problem. Almost.
Okay. So... to make your very own delightful teacup sculpture, first you need to clean your teacups to make sure there isn't any adhesive from the tiny price stickers. When I was done doing that, I placed all of the teacups out so I could choose which ones I wanted to use. As you can tell, I was also indulging in my current Netflix addiction, 30 Rock. What you can't see from this picture is the delectable Bloody Mary I was also also indulging in. I don't know who introduced me to olives in Bloody Marys, but god bless that individual.

Unfortunately, there would be no spray painting inside this particular day, so I had to turn 30 Rock off and go outside. Mainly because my boyfriend has forbidden me from spray painting inside. Again. >.>
Set up your teacups and plate on whatever you're choosing to spray paint on and get to spraying.

Normally, I'd admonish you all to spray carefully and evenly with light, even strokes in the same direction, taking care to not overspray. I did that with all of the teacups, but with the plate, I tried my "misuse" approach. No dice. It looked just like the teacups - evenly covered and painted with no splotches of paint. Freaking amazing.


Once everything is dry, take them back inside to start putting everything together. This is where the fun of mixing your epoxy gel comes in. I bought the kind that has two plungers in one container to avoid putting forth great effort. Remember: I'm lazy.

Once the epoxy gel was mixed, I used a toothpick to apply it to the teacups so they wouldn't fall down all willy nilly like teacups are wont to do.

Once I was through putting the teacups in the positions I preferred and let the epoxy dry, I sadly discovered that it dries... white-ish.

Nice. So back to the spray paint I went.

In the end, the teacup sculpture looks great.

I'll probably end up putting it in our bedroom to save it from the kittens from Hell. God forbid I could ever own a normal pet.

Seriously. What kind of cat seduces the camera? It's not right.
Sunday, August 19, 2012
Twin Peaks Laura Palmer Doll
Warning: I am a huge Twin Peaks fan and I recently decided to attempt to make some custom Barbie dolls, and while discussing this with a close friend the two ideas coalesced into the idea for this project. I'm not a serial killer or anything, swear to soap.
Screen shots from the show provided for reference...
The next custom Barbie I make will be a representation of a live person. Probably.
And after I get better at it, I will post some tips and tricks and some links to helpful doll customizing sites!
Screen shots from the show provided for reference...
 |
| She's dead... |
 |
| Wrapped in plastic. |
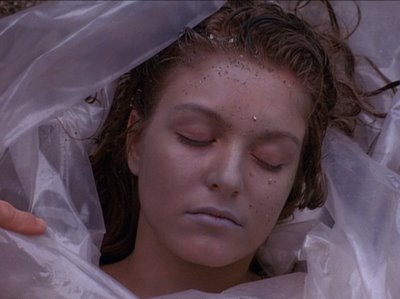 |
| Good Lord, Laura! |
 |
| Laura Palmer. |
 |
| *Deputy Andy weeps* |
The next custom Barbie I make will be a representation of a live person. Probably.
And after I get better at it, I will post some tips and tricks and some links to helpful doll customizing sites!
Monday, July 30, 2012
Twin Peaks-Inspired Office Teaser Post
Here are some pictures of my home office redo. If you follow me on Twitter, you may have already seen these. When I have time to take pictures with a real camera, I'll post them and some how-to links.
Stay tuned for better pictures and some instructions!
 |
| Messy Storage Problem |
 |
| Katrina & Remo help me measure |
 | |||
| Storage Solution |
 |
| Posters |
 |
| That gum you like is going to come back in style. |
Stay tuned for better pictures and some instructions!
Wednesday, February 1, 2012
"Taxidermied" Dinorawrs
Last night, I got into a terrible snit after hearing about the Komen Foundation defunding Planned Parenthood, so I needed to be destructive. Most of the time my destructiveness has a creative end in mind, so when I picked up a hacksaw at my local 24 hour all-purposes store (read: evil Wal-Mart), I also grabbed some plastic dinosaurs.
Ingredients:

Holding the plaque up to the dinosaur, I determined at what angle I wanted him to protrude from the plaque. Once I had this figured out, I proceeded to use the hacksaw to cut him in two.

I got into a pretty good rhythm until I realized that I didn't want to cut a hole in the kitchen table, so I had Chuck hold the dinosaur while I cut through the last of his poor little plastic body. Then VOILA! I had a dinosaur cut in two.

See also: please ignore my (also slightly deranged) boyfriend eating oranges in the background. God knows I tried to, but it's a little difficult when you have this face staring holes INTO YOUR SOUL while you cut dinosaurs in half.

Even though I was just planning on doing one "taxidermied" dinosaur in one sitting, I decided to go ahead and saw Lennon in half. He earned it - he was such a shit talker while Thor was being cut in two. You deserve what you get, Lennon. You. deserve. what. you. get. What a dick.

Even though I was doing this project at two in the morning, I still needed to spray paint my wooden plaques, so I carried them outside to do so. I never thought I would find myself saying this, but most of the damn snow is gone, so I had to go in search of somewhere appropriate for me to spray paint. (I've been just laying whatever I needed to spray paint directly on the ground on top of the snow.) Luckily, I found a small patch of snow left to spray paint on and proceeded to spray like a mother. (But not like a human mother. We don't want to upset @elcinco or give joy to @tedbigsby.) Once the plaques were mostly dry, I brought them back in to dry some more and give the apartment a lovely fragrance of spray paint fumes. I'd post a picture of me spray painting the plaques, but it was really dark and I've been using my phone to take pics, so they didn't come out.
Whilst heating up my glue gun, I went ahead and started cutting out my fabric, using a drinking glass from my pledging days as a template for the shape.

I may or may not have accidentally sharpied the glass. >.>
Oh, well. It'll come off with an alcohol swab. Of which I have a total of none. ::shrug::
Now that the glue gun was heated up and dripping globs of hot glue jizz all over the table, it was time to attach the fabric to the plaque! Starting at one edge of the fabric circle, I began making strips of glue across the diameter of the awesome argyle circle. In the end, I set the pledging glass right side up on the fabric to squish the glue down and form a good seal.

After trimming the random fabric "hairs" from my awesome argyle circle, Thor was ready to take center stage of his taxidermy career. Hot glue went all over his back end and I pressed it into the center of the awesome argyle circle.

After running another strip of hot glue around the outside of Thor's tiny besieged plastic body to make sure he stayed stuck to the plaque, I flipped the plaque over to attach the sawtooth picture hanging hook.

As you can tell, unlike my mother who believed that the back of any craft should be as pretty as the front, I don't give a rat's ass what the back of my crafts look like.

Sadly, the plaque was a little too thin for me to hammer the tiny sharp nails into it, so I ended up using the hot glue gun to attach it.

And with that, I was through with my "taxidermied" dinosaur!


Bonus pic: I'm the Nelly of the Crafty Bitch World. I poured a little diet orange soda out for my homies.

And now for you: if you liked Thor, the "taxidermied" dinosaur & want one of your own, leave a comment detailing what your favorite dinosaur is and why. You can leave your comment on my Facebook, Twitter, or here. I'll pick my favorite on February 8 & send you your very own "taxidermied" dinosaur, featuring Lennon, the Dickish Maybe T-rex!
*I named Lennon for John Lennon. No reason other than I was listening to Oh My Love when I started the project. Thor is named so because the apatosaurus used to be the brontosaurus, which means "thunder lizard."
When I got home, I promptly terrified my boyfriend with the hacksaw (I never did adhere to that whole "pointy things are dangerous, don't point them at people" rule...) and then settled down at my fabulous craft station (read: kitchen table) to destroy something awesome and then make it into something even more awesome.
Pulling out some wooden plaques I had lying about, I assembled my materials.
- black spray paint
- plastic dinosaur of your choosing
- wooden plaque
- fabric you're willing to cut up
- sawtooth picture hanger
- hacksaw
- scissors
- hot glue gun & glue
- optional: sandpaper for if your wooden plaque is a little rough around the edges. But then again, aren't we all?
Holding the plaque up to the dinosaur, I determined at what angle I wanted him to protrude from the plaque. Once I had this figured out, I proceeded to use the hacksaw to cut him in two.
Take notice of the attitude on Lennon, the T-rex, (I think... these plastic dinosaurs are kind of ambiguous, quite frankly, so I suppose my opinion is the one that counts, since they're my dinosaurs, so I'm calling him a T-rex. An oddly misformed T-rex, but a T-rex nonetheless), while his friend Thor* (the apatosaurus) is being hacked in half by a slightly deranged Southerner transplanted in Yankee-land. (This is what I'm holding responsible for my obvious split from reality in choosing to cut dinosaurs in half.)
I got into a pretty good rhythm until I realized that I didn't want to cut a hole in the kitchen table, so I had Chuck hold the dinosaur while I cut through the last of his poor little plastic body. Then VOILA! I had a dinosaur cut in two.
See also: please ignore my (also slightly deranged) boyfriend eating oranges in the background. God knows I tried to, but it's a little difficult when you have this face staring holes INTO YOUR SOUL while you cut dinosaurs in half.
Even though I was just planning on doing one "taxidermied" dinosaur in one sitting, I decided to go ahead and saw Lennon in half. He earned it - he was such a shit talker while Thor was being cut in two. You deserve what you get, Lennon. You. deserve. what. you. get. What a dick.
Even though I was doing this project at two in the morning, I still needed to spray paint my wooden plaques, so I carried them outside to do so. I never thought I would find myself saying this, but most of the damn snow is gone, so I had to go in search of somewhere appropriate for me to spray paint. (I've been just laying whatever I needed to spray paint directly on the ground on top of the snow.) Luckily, I found a small patch of snow left to spray paint on and proceeded to spray like a mother. (But not like a human mother. We don't want to upset @elcinco or give joy to @tedbigsby.) Once the plaques were mostly dry, I brought them back in to dry some more and give the apartment a lovely fragrance of spray paint fumes. I'd post a picture of me spray painting the plaques, but it was really dark and I've been using my phone to take pics, so they didn't come out.
Whilst heating up my glue gun, I went ahead and started cutting out my fabric, using a drinking glass from my pledging days as a template for the shape.
I may or may not have accidentally sharpied the glass. >.>
Oh, well. It'll come off with an alcohol swab. Of which I have a total of none. ::shrug::
Now that the glue gun was heated up and dripping globs of hot glue jizz all over the table, it was time to attach the fabric to the plaque! Starting at one edge of the fabric circle, I began making strips of glue across the diameter of the awesome argyle circle. In the end, I set the pledging glass right side up on the fabric to squish the glue down and form a good seal.
After trimming the random fabric "hairs" from my awesome argyle circle, Thor was ready to take center stage of his taxidermy career. Hot glue went all over his back end and I pressed it into the center of the awesome argyle circle.
After running another strip of hot glue around the outside of Thor's tiny besieged plastic body to make sure he stayed stuck to the plaque, I flipped the plaque over to attach the sawtooth picture hanging hook.
As you can tell, unlike my mother who believed that the back of any craft should be as pretty as the front, I don't give a rat's ass what the back of my crafts look like.

Sadly, the plaque was a little too thin for me to hammer the tiny sharp nails into it, so I ended up using the hot glue gun to attach it.

And with that, I was through with my "taxidermied" dinosaur!


[That's an 8x10 photo on the left for size comparison.]

Bonus pic: I'm the Nelly of the Crafty Bitch World. I poured a little diet orange soda out for my homies.

And now for you: if you liked Thor, the "taxidermied" dinosaur & want one of your own, leave a comment detailing what your favorite dinosaur is and why. You can leave your comment on my Facebook, Twitter, or here. I'll pick my favorite on February 8 & send you your very own "taxidermied" dinosaur, featuring Lennon, the Dickish Maybe T-rex!
*I named Lennon for John Lennon. No reason other than I was listening to Oh My Love when I started the project. Thor is named so because the apatosaurus used to be the brontosaurus, which means "thunder lizard."
Tuesday, October 25, 2011
Bleeding Jell-O Heart

My favorite Halloween dessert is found in the pages of Penn & Teller's "How to Play With Your Food", and you should probably just go buy a copy right now because it is THAT GOOD. If you don't want to spend money on what is arguably one of the coolest books ever made, that's fine, you can find the recipe here instead.
I made this heart with raspberry-flavored Jell-O, and it was the best-tasting one I've made so far. But when you make this dessert, be prepared for the inevitable portion of your guest who will NOT eat it, no matter how many times you sing the jingle or say, "There's ALWAYS room for Jell-O!" maniacally.
Thursday, October 6, 2011
Everywhere We Go, People Want To Know Who We Are. So we tell them...
We are a loose conglomeration of pretty geeky Twitter friends who all like to make things. This blog is a place for us to say, "I made this!", and hopefully entertain each other and maybe a few other people as well. Some of us make things for profit and some make things only for themselves and their friends and family, but that doesn't really matter here.
The crafts you see here are apt to be snarky and pop-culture saturated. We may curse. We may post sporadically. Who knows? This is an experiment, and we're excited to see how it turns out!
First, a little bit about our collaborators:
A little bit about me: Nickname - tdro Real name: Terry D. Etsy name: bunnybubbles
Favorite things to make: Soap, miniature top hats, things out of polymer clay, cakes.
What do I do when I'm not making things? During the day, I'm an office manager. At night, I make things, usually while watching something on Netflix, or watch some tv with my hubby. My current media obsession is Dark Shadows, but my obsessions are generally fleeting and if you don't care for what I'm madly in love with right now, wait a week and see what my new one is. Also, I like reading and discussing cute boys. I talk about etsy A LOT.
If I were an animal, what animal would it be?: Meow.
Contact information: You can find me on twitter as @tdro (private) and @bunnybubbles (public). My etsy shops are bunnybubbles.etsy.com and bunnyscrafthutch.etsy.com.
A little bit about Mallory: Former podcaster, currently craft obsessed.
Favorite things to make: Right now I love cross stitching and most anything embroidery related. I have been known to crochet in the past as well!
What do you do when you're not making things?: Generally I'm reading, writing or playing video games. Mostly playing video games...mostly playing Minecraft.
If you were an animal, what animal would it be?: An owl
Contact information: You can contact me via Twitter @malloryduval, via email geekxstitch@gmail.com and my personal blog over at hayiaf.com!
A little bit about Laura: Hedgehog enthusiast, pseudo-sorority sister, Tolkien nerd, glasses aficionado, artificially ginger, apparently sassy, always proper.
Favorite things to make: food stuffs, knit goods, and cross-stitched geekeries
What do you do when you're not making things? I'm a paralegal and single mom to two tiny nerds.
If you were an animal, what animal would it be?: a fox
Contact information: @elcinco, thegirlswithglasses.blogspot.com
A little bit about Sabs: I'm a 28 year-old British Columbia transplant that moved to Iowa and got married in May of 2010. A self-professed geek/fan girl and a big kid at heart, I collect many things.
Favorite things to make: Various blank canvases. I got into painting paper mache anything and everything. I really started with skull masks last Halloween and now it's anything I can get my hands on!
What do you do when you're not making things? Since May of 2011 I am the receptionist at the local FOX/CW affiliate, so that's all kinds of fun. When I'm not working: internet junkie, light gamer (mostly hand-held), photography, player of a black sparkly ukulele and collector of colored Converse All-Stars.
If you were an animal, what animal would it be?: Either a bird or a fish. Just being able to have that freedom to fly or swim wherever you want is really appealing to me.
Name: Brewtown Andy
A little bit about me: wearer of many hats. Husband and father, lover of bacon, recovering Catholic, Time Magazine’s Person of The Year for 2006. Theatrical greaser, Jew, cowman, Nazi butler. Saxophone player, sports enthusiast and renaissance nerd. Lady’s Man, Man’s Man, Man-About-Town. He also owns a very large TV.
Favorite Thing To Make: Geek Cross Stitch and anything that I can cook that my 2 kids will eat.
Other Things: I work at [REDACTED] where I [REDACTED] while listening to podcasts. I also write for Anonymous Eagle (link: http://anonymouseagle.com), a Marquette University sports blog.
Animal: NOT a badger. Eff those guys.
Contact info: Twitter: @brewtownandy
Name: ZiolkoAndStuff
A little bit about ZiolkoAndStuff: St. Louis based twentysomething who does a little bit of everything.
Favorite things to make: Puppets, hats, costumes, scarves
What do you do when you're not making things? Theatre, theology, working retail until something better comes along, trombone, reading, and stuff.
If you were an animal, what animal would it be?: Squirrel
Contact information: ZiolkoAndStuff@twitter
A little bit about Heather:
Heather is a fiercely independent Southern belle that hates falling in love almost as much as making her bed. Despite her aversion to falling in love, Heather has a Cinderella complex, still believes in happily ever after, and is currently dating the dorkiest man alive. By day, Heather works & performs mind-numbing activities that may or may not be sucking out her soul. To combat the monotony of her lackluster work monkey days, Heather goes on wild adventures with her roommates into the Memphis night, saving the world one Jack Daniels shot at a time.
Favorite things to make: x-stitch, knitting, crocheting, painting, various other crafty type things
What do you do when you're not making things? Obsessively watching movies & convincing others into purchasing record players.
If you were an animal, what animal would it be? A chimpanzee that rips your face off
Contact information: If you’re not currently employed by the IRS or that bar in Florida she’s banned from, you may find Heather on Twitter @heatherleanne
I fully expect to add more collaborators to this post and the blog. If you are interested in participating, find me on Twitter and let me know!
Now... LET THE WILD RUMPUS BEGIN!
The crafts you see here are apt to be snarky and pop-culture saturated. We may curse. We may post sporadically. Who knows? This is an experiment, and we're excited to see how it turns out!
First, a little bit about our collaborators:
 |
| Terry (aka tdro) |
Favorite things to make: Soap, miniature top hats, things out of polymer clay, cakes.
What do I do when I'm not making things? During the day, I'm an office manager. At night, I make things, usually while watching something on Netflix, or watch some tv with my hubby. My current media obsession is Dark Shadows, but my obsessions are generally fleeting and if you don't care for what I'm madly in love with right now, wait a week and see what my new one is. Also, I like reading and discussing cute boys. I talk about etsy A LOT.
If I were an animal, what animal would it be?: Meow.
Contact information: You can find me on twitter as @tdro (private) and @bunnybubbles (public). My etsy shops are bunnybubbles.etsy.com and bunnyscrafthutch.etsy.com.
 |
| Mal |
Favorite things to make: Right now I love cross stitching and most anything embroidery related. I have been known to crochet in the past as well!
What do you do when you're not making things?: Generally I'm reading, writing or playing video games. Mostly playing video games...mostly playing Minecraft.
If you were an animal, what animal would it be?: An owl
Contact information: You can contact me via Twitter @malloryduval, via email geekxstitch@gmail.com and my personal blog over at hayiaf.com!
 |
| Laura (aka El Cinco) |
Favorite things to make: food stuffs, knit goods, and cross-stitched geekeries
What do you do when you're not making things? I'm a paralegal and single mom to two tiny nerds.
If you were an animal, what animal would it be?: a fox
Contact information: @elcinco, thegirlswithglasses.blogspot.com
 |
| Mask by Sabs |
Favorite things to make: Various blank canvases. I got into painting paper mache anything and everything. I really started with skull masks last Halloween and now it's anything I can get my hands on!
What do you do when you're not making things? Since May of 2011 I am the receptionist at the local FOX/CW affiliate, so that's all kinds of fun. When I'm not working: internet junkie, light gamer (mostly hand-held), photography, player of a black sparkly ukulele and collector of colored Converse All-Stars.
If you were an animal, what animal would it be?: Either a bird or a fish. Just being able to have that freedom to fly or swim wherever you want is really appealing to me.
 |
| Mrs. and Mr. Brewtown |
A little bit about me: wearer of many hats. Husband and father, lover of bacon, recovering Catholic, Time Magazine’s Person of The Year for 2006. Theatrical greaser, Jew, cowman, Nazi butler. Saxophone player, sports enthusiast and renaissance nerd. Lady’s Man, Man’s Man, Man-About-Town. He also owns a very large TV.
Favorite Thing To Make: Geek Cross Stitch and anything that I can cook that my 2 kids will eat.
Other Things: I work at [REDACTED] where I [REDACTED] while listening to podcasts. I also write for Anonymous Eagle (link: http://anonymouseagle.com), a Marquette University sports blog.
Animal: NOT a badger. Eff those guys.
Contact info: Twitter: @brewtownandy
 |
| ZiolkoAndStuff. Or, a squirrel. |
A little bit about ZiolkoAndStuff: St. Louis based twentysomething who does a little bit of everything.
Favorite things to make: Puppets, hats, costumes, scarves
What do you do when you're not making things? Theatre, theology, working retail until something better comes along, trombone, reading, and stuff.
If you were an animal, what animal would it be?: Squirrel
Contact information: ZiolkoAndStuff@twitter
 |
| Heather |
Name: Heather
Heather is a fiercely independent Southern belle that hates falling in love almost as much as making her bed. Despite her aversion to falling in love, Heather has a Cinderella complex, still believes in happily ever after, and is currently dating the dorkiest man alive. By day, Heather works & performs mind-numbing activities that may or may not be sucking out her soul. To combat the monotony of her lackluster work monkey days, Heather goes on wild adventures with her roommates into the Memphis night, saving the world one Jack Daniels shot at a time.
Favorite things to make: x-stitch, knitting, crocheting, painting, various other crafty type things
What do you do when you're not making things? Obsessively watching movies & convincing others into purchasing record players.
If you were an animal, what animal would it be? A chimpanzee that rips your face off
Contact information: If you’re not currently employed by the IRS or that bar in Florida she’s banned from, you may find Heather on Twitter @heatherleanne
I fully expect to add more collaborators to this post and the blog. If you are interested in participating, find me on Twitter and let me know!
Now... LET THE WILD RUMPUS BEGIN!
Subscribe to:
Posts (Atom)